

How to Modifying the Mini Ultra Stick for a 480
Friday, September 18, 2009
There's been a little confusion on how to modify the Mini Ultra stick when upgrading from the recommended 460 sized motor to a much more powerful 480. First, the holes in the firewall won't line up because the X mount for the 480 is larger. This gets a little more complicated when you go to drill new holes because there isn't much meat between the existing holes and the new ones. If you aren't careful, you can drill right into the existing hole and then you've got an elongated mess.
To get around this, I use bamboo dowels to plug the holes. Depending on the size you get, you may or may not need to enlarge the existing holes. Bamboo is aopparenly a little on the soft side, so when my dowels turned out to be a little oversize, I just turned them by hand and they sort of screwed themselves in. Where you need to be careful is not to allow any of the dowel to poke out the front of the firewall, because that could jack the engine mount and cause you thrust problems. I made sure the front of the dowel was square using a miter box tool, and once the dowel is pressed in, I pushed the dowels until the stuck out just a bit, and then pressed the face of the firewall against my flat workbench to push the dowel back to a flush fit.
Now the holes are plugged and you can drill the new ones. To make sure they are in the right location, use the innermost holes in the firewall (which is the same pattern as where the engine mounts to the X mount) and temporarilly bolt the X mount to the firewall. Now, you use the outer holes in the X mount as a template and drill the new mounting holes.
Let me take a few more pictures and I'll be back with more.
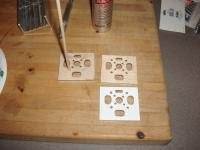
Now, test fit the firewall. Below is the original photo, so you can see what it looks like. Next to it is a copy that I photoshopped to make illustrating my modifications easier to explain.
The picture is looking forward from inside the radio compartment at the backside of the firewall. As you can see, the firewall seats on a recessed plywood plate. To get the correct thrust angle, the firewall must sit flush on this plate.
Looking at the retouched photo, on the left I have painted the original, but now plugged, holes in pink, and the new holes are in black. You can see how close they are together, which is why I plugged the originals. While this isn't strictly necessary, I don't like the idea of those holes being so close to a olad bearing part of the firewall. It's stronger this way and i just feel better about it.
On the right of the retouched photo, you can see in blue where the blind nuts at pressing up against the oplawood plate the firewall is supposed to fit flush against. Obviously, this will have to be relieved or the firewall won't fir the way it's supposed to....further reading on www.rcgroups.com
Labels: rc airplanes
at 12:24 PM
Post a Comment