

Following Trex 500 RC Helicopter Steps 2
Tuesday, January 19, 2010
In this Following Trex 500 RC Helicopter Steps 2 article we will talk about trex 500 rc helicopter rotor head. You can read my previous article about Following Trex 500 RC Helicopter Steps 1, those article is talk about the trex 500 rc helicopter introduction. I think you should read the article first before you read this "Following Trex 500 RC Helicopter Steps 2" article. If you already read my previous article about Following Trex 500 RC Helicopter Steps 1, it's time to go through next trex 500 rc helicopter parts, its..
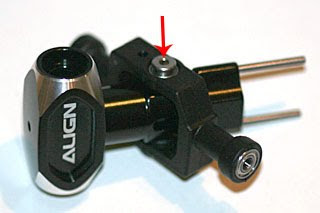
The highlighted where loctite must be applied with red markers. Usually to highlight the particular screw or thread where the loctite should be applied.
The rotorhead is the most complicated part of the build. Fortunately this is split down into several steps which make it a little simpler to follow. The first step is installing the flybar seesaw. This part comes loosely pre assembled and all that is required is to remove the two screws add some Loctite and then put them back. This then completes the very first build step.

Following the assembly of the flybar seesaw we have another relatively straightforward build step. This time we are assembling the flybar cage and this consists of installing two push rod's onto the flybar cage and then inserting the four screws with Loctite and tightening it all up. The manual shows that the push rod is tightened until the ball links are touching. The two ball links should be orientated such that the 'A's on them are facing opposite directions. When installing these onto the cage make sure that one is installed from one end and the opposite one is installed from the other end. This is shown in the video of this build step and is quite difficult to explain in text. The reason for doing this is because if you install both push rods onto the cage from the same end then one of the push rods will need a half turn when you come to attach it to the washout arms.

Next the upper mixer arms are assembled as shown below. Once the balls are installed onto the mixer arms they can be attached to the flybar seesaw using self tapping screws. Make sure that you have a washer underneath the head of the self tapping screws as well as between the mixer arm and the flybar seesaw. Be careful not to over tighten the self tapping screws as it is quite easy to strip the threads.

Next we have the washout assembly. All that is required for this build step is to remove the two screws securing the washout arms to the washout hub. Apply Loctite, and then replace the arms and tighten.
Trex 500 RC Helicopter Rotor Head

The highlighted where loctite must be applied with red markers. Usually to highlight the particular screw or thread where the loctite should be applied.
The rotorhead is the most complicated part of the build. Fortunately this is split down into several steps which make it a little simpler to follow. The first step is installing the flybar seesaw. This part comes loosely pre assembled and all that is required is to remove the two screws add some Loctite and then put them back. This then completes the very first build step.

Following the assembly of the flybar seesaw we have another relatively straightforward build step. This time we are assembling the flybar cage and this consists of installing two push rod's onto the flybar cage and then inserting the four screws with Loctite and tightening it all up. The manual shows that the push rod is tightened until the ball links are touching. The two ball links should be orientated such that the 'A's on them are facing opposite directions. When installing these onto the cage make sure that one is installed from one end and the opposite one is installed from the other end. This is shown in the video of this build step and is quite difficult to explain in text. The reason for doing this is because if you install both push rods onto the cage from the same end then one of the push rods will need a half turn when you come to attach it to the washout arms.

Next the upper mixer arms are assembled as shown below. Once the balls are installed onto the mixer arms they can be attached to the flybar seesaw using self tapping screws. Make sure that you have a washer underneath the head of the self tapping screws as well as between the mixer arm and the flybar seesaw. Be careful not to over tighten the self tapping screws as it is quite easy to strip the threads.

Next we have the washout assembly. All that is required for this build step is to remove the two screws securing the washout arms to the washout hub. Apply Loctite, and then replace the arms and tighten.
Take note that these washout arms are very similar to the new upgrade washout arms that have just been announced for the T-Rex 600. So here we have some product improvements from the T-Rex 600 available as standard on the T-Rex 500.
>> Following Trex 500 RC Helicopter Steps 3Labels: rc helicopter, rc helicopters
at 1:21 PM
Post a Comment